Translate

Showing posts with label hand applique. Show all posts

Friday, November 22, 2013

A Crisis Helps to Work in the White Spaces

Much of my concentration has been on replacing the red and green fabric applique. Now I'm realizing that I need to work on some of the weak spots on the background as I notice them.  In an earlier post I recommended marking the areas that need repair as I go.  This is a good idea.  But if I just mark them, they will all be waiting for me when I'm done with the red and green restoration.  Just working on white will be boring.

So as I write this, I've completed 8 1/2 applique blocks, it's looking beautiful. I've decided to ocasionally let myself repair a rip in the white space. This mixes up the different tasks to vary the job a little bit.

Outburst of Joy, (c) 1984 by Ann Fahl.  My apologies, this is a scan of an old photo, it's the best I can do.
Many years ago I entered a very colorful wallhanging into a local quilt show.  It was a compass style piece with an interesting border, all hand quilted.  This quilt was titled "Outburst of Joy" won a prize, a ribbon was pinned onto the quilt. At the conclusion of the show the ribbon was lying on the floor and there was a 3 cornered tear in the black background of the quilt!


The show organizers were most apologetic and were horrified that this had happened. When they pointed it out to me, I looked at it, and realized that it was small, a tear of about 1/2 inch in two different directions. Fortunately it was contained within a small triangular section of straight line quilting; and I realized that I could applique a matching piece of fabric over the tear. I did this the minute I got the quilt home.

With little tiny stitches, I appliqued a piece of black just inside of the hand quilting stitches.  It fit inside the quilting lines, perfectly.  Because it was a perfect match, nobody except me knew that it had been patched.  This quilt has been sold, long ago. If the owner is reading this blog, this is the first they will know of this affair! 

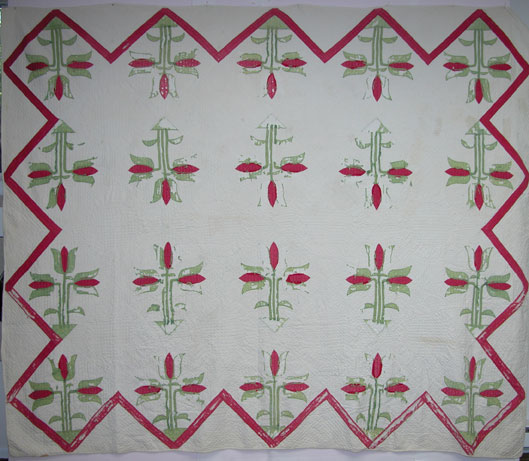
This is exactly what I will do to the areas in the white background of the tulip quilt as I find and mark them. I will cut a patch of the well washed muslin, and applique it within the quilting lines.
The split in the fabric was marked with thread.

A patch has been cut and appliqued within the quilting lines.

If the damaged area is larger, I will applique a much larger patch, yet inside of the quilting pattern, and quilt over the entire repaired area to match the original.
The patch has been quilted, so the quilting pattern is continuous.  This helps to camouflage the repair.
These photos do look pretty awful, but you are only looking at a small area of the quilt.  When you open the entire quilt up, and you see all the patterns, these patches almost disappear. It's difficult for me to find them. Quilt conservators might use a sheer netting for these repairs. I am intending on using this quilt daily, so I want to repair the weak spots with something that will withstand a little more wear and tear.  My new patches provide new strength to the area.

Still sewing.
Ann
 

Friday, November 1, 2013

Red and Green Tulip Quilt.........it's history


Here is Oreo sitting on the quilt, with six blocks appliqued.
Here is what I know about the history of this quilt.  It was at the cottage in Winona Lake IN.  It was probably obtained from someone in Marion IN where my great grandparents lived.

My friend Linda Honsberger (appraiser and quilt historian) looked at my quilt and was able to tell me quite a bit about the history of my Red and Green Tulip Quilt.

This is what I've learned about it's beginnings:

  •         It is of German or Mennonite origin
  •      Possibly made in Ohio
  •         Made about 1880
  •         Has wool batting, very thin in places
  •         Hand appliquéd with white thread
  •         Turkey red fabric is in rather good condition.  Only the red outer border has some bad spots.
  •         Green fabric has almost totally disintegrated.  The dyes used at the time, have weakened the fibers so it literally just pulls away easily with your fingers.
  •      It has white cotton binding cut on the straight of the grain, 3/8 inch wide.
  •         The hand quilting is decent. The alternating blocks have a simple feathered circle. The  quilting in the appliquéd blocks and border is straight lines.
  •         The white background fabric is in fairly good condition, there are a few splits in the fabric, so I will repair those by appliquéing well washed muslin over them. 
  •      It was likely a 13th quilt, or someone's wedding quilt, or good quilt that was saved for special occassions.
  •      Sadly, we do not know the maker.

Friday, October 25, 2013

The Actual Rescue of a Quilt Block

We will begin the repairs on this block.

Earlier I talked about what order I would re-applique the blocks. It's not very exciting, but I like to begin with the three stems.  I'll take you through this, step-by-step.  It is important that you remove only one piece at a time; replace it; and then remove the next piece.

Why? because when you remove a piece there are little holes and short threads remaining, to show you exactly where you should stitch the new piece.  If you take off too many pieces at a time you'll lose the markings.  This is old fabric, I don't want to mark with a pencil if I don't have too.

Carefully removing the center stem to be replaced.
I use a seam ripper or a tiny pair of embroidery scissors to do the removing. Make sure you have good light on the project. Remember these threads are old and the fabric underneath is fragile so it's important not to just rip and tear things off. Be gentle.

As I remove threads along the stem, I have to clip some of the stitches on the nearby leaves, but I let them stay in place. Then I replace the center stem with a bias strip. Now you can pull out all the little old snipped threads that were marking its position. Next I remove the right stem and replace, then the left stem and replace. By this time the four leaves are almost hanging by a thread. So one at a time, I remove and replace until all four leaves are finished.
The stems have been replaced with new bias strips, new leaves have been appliqued and the lower triangle has been added.
Now it is time to work on the tulips. The red fabric is shabby, but still firm. So I will leave it in position unless there is a big lump at the outer tip of the flower. If this is the case I'll snip a few threads on the tip, and remove the lump. Now, I'll pin the red tulip petal over the existing red piece and applique it into position. 
Red center petal pinned;  only the upper tip is needle turned and appliqued; remaining edges are raw.
Notice that the lower tip of the red center is folded under. I just pin it in place. You'll notice the fold is aligned with  the lower edge of the green petal. You can also see the black top of a pin marking the edge of the green petal on the left side.

After the one center red petal is pinned and sewn; I lay on the two green side petals. Sometimes the original petals are in such bad condition that they get totally removed. Others that aren't too bad, I'll just applique the new petal over the old.
Green petal appliqued on left side of tulip
Now all that is left is to applique the right green petal.  There are 3 of these tulips in each block.
As of Oct 12, 2013  I have completed 6 blocks and some of the border. I am pleased with my progress.

Still stitching.

Ann Fahl


Friday, October 18, 2013

A New Look for an Old Block

As I begin this blog, I've got 2.5 blocks finished.  Working a little bit each evening, I can re-applique one block in a week.  It's important that this be a NO pressure project, just sewing a little if I feel like it.  Those are my guidelines.  No more high pressure projects that have to be done by a due date!  Quilting should be enjoyable and relaxing.  I've been missing the "relaxing" part for the last few years. And this quilt is for me, not for a show with entry deadlines and qualifications.

When I began my quilting career in 1978, I quilted for about 3 hours every evening. When I say "quilting" I mean all the hand work; applique, quilting and finishing the binding.  I looked forward to this part of every day.  When my children came along, I didn't get 3 hours anymore, but after they were tucked in, I sat down with latest quilt. This was a little bit of my stitching heaven.

Since I've made the switch to being a machine quilter, I've had nothing left to do in the evening, maybe sewing on a label or finishing the occassional bias binding. So this old quilt is fulfilling a need for me.
The first block re-appliqued is one on the outside corner.
When I stepped back from the completed block, I said, "wow."  What an amazing change. I can only imagine how the quilt will look when it is done.  There will have to be some requilting on top of the applique, but that's too much for me to think about right now. Tomorrow is another day. Didn't Scarlett say that?
Detail of the the stems and leaves.
 In the previous post, I talked about how the leaves needed to have points and the stems should be laid under the flowers.  So here is what I meant.  I am also using matching thread colors so little boo-boos don't show. This is quite pleasing to the eye.
A closeup of one of the appliqued tulips. Notice how nice the stem sits under the flower.
I am not restoring this quilt for a museum, I'm fixing it for myself, so I'm taking some liberties with my techniques.  I am using hand techniques that I like to use, and are high quality, not duplicating the stitching by the original maker. So I'm using matching thread.

Next time I'll show you a block in progress.

Ann Fahl


Friday, October 11, 2013

Thoughts on Workmanship

Here is a look at the beautiful stitches on the red tulip pieces.  This woman's workmanship was beautiful, and I don't find the white thread too distracting. At this time in history, a tiny whip stitch was usually used with white thread no matter what the color of the applique.
Small white whip stitching holds the red petal in position

The green fabric is just about gone, so it is hard to tell how the stitches actually looked. There are some whip stitches but there is other sewing with light green thread.  It seems like a different person sewed on the green; or made repairs in later years.   

Look at how the stems are folded over on top of the tulip.  This drives me nuts. Why didn't the maker slip the end under the flower? It would have looked so much nicer and would have been less trouble.
There is a lump at the base of each flower where the bulky stem was turned over.


See how the leaves were almost too big to fit in the spaces, so the maker stuck the ends under or over the stems to fit them in!  This gives an awkward look.  I will trim my leaves to a smaller size so they fit in each space, and give them points at both ends. Look at the photos above and below.
The base leaf on the left was laid over the stem. The leaf on the right barely touches the stem, this is more pleasing. 
The blocks are approximately 14 inches square. What I am seeing is that our skill level and tools we use in quilting today are so far superior to what women used years ago.  Our quilts are so much easier to make.  Also we have good light in our sewing areas and homes which even in the 1950's we didn't have.  

I don't mean to be too critical of this woman's work, it is a beautiful quilt. But the difference is in how far we have come in the quilting world. These little details make a big difference in the final appearance of the quilt.  I think I've been competing in judged shows too long.

At the time I am writing this post, I've actually appliqued 2 blocks and they look beautiful.  Next time, I'll show you the difference!


Friday, October 4, 2013

Where do I Begin?

These blocks are lovely and I've always liked the color choices the maker used.  I've made hundreds of quilts, done lots of hand work in my life, but never restored one like this. Where do I begin?
I think it is wise to remove one old piece at a time. The old stitching holes and pieces of old thread will mark the spot where I should sew the new piece on.  Beginning with the 3 center stems. The original maker used bias strips. So I constructed enough green bias all at one time to finish all 20 blocks.  I cut 1.5 inch strips, pressed them in half, then almost in half again to create .5 inch strips with both edges folded under, and easy to applique. I made 560 inches of bias! That should be enough to complete all the stems.

Next is the leaves. As I look at what is left of the blocks I see there isn't much consistency of size.  So I traced over the tiny leaves at the top and the larger leaves at the base to create plastic templates.  Wow, I haven't made templates in years.  I cut out enough just for several blocks so I can get going with my project. I'll cut more as needed.

Now the tulips, each consists of a red center and two green petals.  So I've done the same thing, made plastic templates and cut out enough for only 2 blocks.  I'm anxious to get going.
Tulip pieces in both red and green have been cut with scissors, like the original maker.
I will work in this order, removing all or portions of the damaged piece first:
  • Middle, right left stem
  • Lower green corner triangle
  • Middle red tulip piece, then 2 green side pieces
  • Tiny top leaves on both sides of the stems
  • Large lower leaves on each side of the stems

As I work, I'll pull out the old stitches and look for places on the front and back that may need repair.  I'll make those using some muslin that is well washed and matches the white background pretty well.

The quilt was appliqued with white thread.  This was done for many years, and was traditional to use white. But I love color and own thread in hundreds of colors so I will be appliqueing with matching red and green thread.

Hmmmm, each block times 20.  That's a lot of blocks.

Ann Fahl

Friday, September 27, 2013

Choosing the Fabrics

These are the new fabrics purchased for the restoration of this quilt.
You might say, "those fabrics look really dark!"  Well actually they are very close to the original color found on the underside of the old appliqued fabric.  I chose one that was a little richer in color rather than lighter than the original.

The fabrics are exactly what I was looking for, they are slightly mottled, so they'll blend in with the age of the quilt when washed.  The green fabric is from the Troy Corp, Riverwoods Collection, Modern Textures by Marcia Derse of mddesigns.  The red is called Solids for moda.

When I get home with my bag of fabric I want to begin right away. BUT:::::::::::the fabrics need to be rinsed out first.  I always do this with every fabric I own.  I rinse the fabric in hot water in my sink.  If it bleeds, I continue to rinse until the color is gone. Then it goes in the dryer. This prewashing accomplishes many things:
  • Removes excess fiber and lint from the fabric
  • Rinses off extra finishing chemicals from the fabric
  • Removes excess dye so color doesn't run onto the background or neighboring fabrics
  • When dried in the dryer, fabric may shrink so that the seams will be more stable and cause less puckering.
Only after this has been done, does a fabric go into my "stash."  It only takes one disaster for you to say, "Oh, why didn't I take the time............."

I've made my templates, cut a few tulips out,  and I'm ready to begin the hand stitching that I've been waiting for so long.  I can hardly wait to sleep under this quilt.

Let the journey begin.

Ann Fahl

Friday, September 20, 2013

The Red and Green Renovation Begins

Original border block of the Red and Green Tulip quilt.
Why am I spending the time to do this?  Not only do I love the quilt, but the white background and the quilting are in good shape.  The base is solid, only the appliques are falling apart.  So my thoughts are to remove the really bad parts, and just applique over all of the design, so the quilt looks consistent across the top. I plan on using this on my bed!

Off I go to the Sew 'n Save in Racine, they have a lovely fabric store next to their sewing machine shop.  I've decided that I need 2 yards of green and 3 yards of red fabric.  When matching old fabrics, I find it helpful to have a swatch to find the right colors.  Because there are so many bad spots on the applique, there were small places that I could cut off to expose the original color underneath. So this is what I took with me:
These are the little snippets of the actual fabric I took with me to match colors.
It didn't take long before I found the right fabrics. I'll show them to you next time.

Ann Fahl

Friday, September 13, 2013

Saving an Old Quilt

So here is the quilt, it's a big one, 85 x 102 inches.  The blocks, set on point are 14 inches square. The applique is by hand, and has been done and repaired by several hands.
Red and Green Tulips, a family quilt, no date or maker
As you can see, the red fabric is in much better shape than the green. The green can literally be just pulled off and it's in your hand.  More of it is gone, than present! The condition of the quilt is POOR. Because it is from the cottage, it is very special to me and worth spending the time to rescue.

What is the story of this quilt? No one living in my family knows anything about it.  But here is the story I have put together, based on a few facts. 

My great grandfather was one of the founders of a building and loan in Marion IN, he went to the same Presbyterian Church as Marie Webster. He was a good businessman and seemed to know lots about real estate ownership and management. Then the great Depression hit Marion and the USA.  He then became an owner of too many houses, and they all needed to be repaired and perhaps rented to keep the building and loan afloat. These years were difficult for everyone.

Grandpa must have taken some items in trade instead of rent, when the tenants couldn't pay. I think that is where this quilt came from.  This beautiful appliqued piece was something that had been treasured and had some value to the original owner, so it was given in lieu of rent. It had been well cared for and it was probably old at the time of the Depression. This is why I think it came from a family in Marion IN, but who knows where it was originally made.

Another theory is that when people left these homes, some of their belongings were left in the buildings. But I cannot see a woman leaving a precious quilt in a home she was leaving.  This still may have happened. I'll never know these details!

Grandpa bought the cottage in 1927 and owned it until about 1940.  Over the years all kinds of things turned up at the cottage, it had a big porch and living room and 4 bedrooms that needed to be furnished. This quilt was one of the things that was in the big trunk upstairs, and I've kind of grown up with it.

Now it is time to begin the time consuming task of repair. I'm looking forward to this part.

Ann Fahl

Friday, September 6, 2013

A Change of Pace.... a new project

For awhile now I've felt like I needed to return to my quilting roots, to work on a hand project.  This sounds a little strange for a 'dyed in the wool' machine person like myself. But I'm tired of the rush and the push to finish projects fast. I want to be a slow quilter; savoring each stitch and enjoying the feel of the soft cotton fabric in my hands.

Before I ever took a quilting class, there was a beautiful red and green tulip quilt that used to be on the brass bed in the master bedroom at the cottage.  By the time I took that all-important first quilting class, I pulled it out of the closet and admired it, for the color choices and the good quilting stitches.

Sadly I realized that time had taken a toll on that quilt.  The green fabric was falling apart, and the red wasn't too far behind.  Someone folded up the quilt and stored it in the old trunk upstairs so it hasn't been seen or slept under for a long time.

Last time I was at the cottage, I dug it out of the trunk and asked if I could have it.  In its current condition nobody would ever want to use it!  So I brought it home.  I've purchased 5 yards of fabric to re-applique the blocks, by hand.
Red and green tulip quilt block to be restored by Ann Fahl
So I have begun what may be a lifetime project. Will it take a year or ten?  Who knows.  I've spent a little time each evening adding a new piece or two. This feels right. Why has it taken me so long to work with my hands again?  Next time I'll show you the quilt and tell you its story.

Ann Fahl

Friday, April 12, 2013

Digging up History

We had the main level of our house painted.  In the process, all the quilts, pictures and paintings are taken down; and everything gets moved.  After the painters left, I like to change the placement of all the artwork in the house.  Just by chance I found a very old quilt that I made for a gift for my husband in 1984.  It's amazing what you find when you have to clean.
Hand Prints for Daddy (c) 1984 hand appliqued and quilted by Ann Fahl
This is such a charming little piece, that I pulled it out and laid it on my sewing table.  It just needed a little more hand quilting around the inner border and would hang better.  So I hand quilted last night for the first time in years.  This is now hanging on a wall in my living room so my husband and I can enjoy it each day.

It's hard to believe that my grown sons were once this small. Now they are tall young men, on their own, with their own careers.  It's good to look back in your history and at your early work.  As you can tell it isn't square.  I didn't know anything about blocking my quilts at the time.  But I did realize the importance of signing my quilt.
Signature on the lower right corner
It is good to see that I have greatly improved my skills over the years. Machine quilting has totally changed the world of quilting, it enhances the surface so much more than a lightly hand quilting one like this.

Go digging in your closet and look at the quilts you made in your first years. You'll be amazed at your progress!

Ann Fahl