Translate

Showing posts with label thread tips. Show all posts

Friday, December 7, 2012

Fresh Salsa's Finale with Summary

The Border

We're at the end of the project. It's time to quilt the border. Again I have returned to that plan I drew up before all the quilting began. 
Ann's quilting plan for Fresh Salsa
 I doodled lots of things on the page but here's what I did for the border it is done in two parts.
Part one of the border.
I marked a curvy line in the border, dividing it roughly in half; with a silver pencil.  I danced (quilted) this area with leaves, spirals hearts and spirals. Then I went around the outside with some curvy lines that intersect the outside edge. This will make a nice flat edge when I block the piece and trim the edges.
Finished border.
The Binding

I found 4 different fabrics that might work for the binding.  It's always exciting to get to this point, because I know the quilt is almost done.  Put some careful thought into your fabric choice, because this is like a frame on a painting. Think of it as the sparkle on the edge. When you look at your top, do you want a contrasting edge or a subtle edge?  For me, it depends on the quilt and my mood at the time.  For more info on bias binding, may I recommend my booklet on binding.  You may think differently about it after reading the 28 pages that I've written. 
Here are the fabrics I though might work for the binding.
So which fabric won?  I thought it would be the green check on the left! The red/pink/yellow multi was too busy.The green/blue/red stripe was a decorator chintz looked great. I went out and purchased the small stripe on the right.  It had a sense of humor and pulled out all the colors in the top, but when placed on the quilt itself it was more pastel than I wanted.  So the winner is........the green decorator chintz.
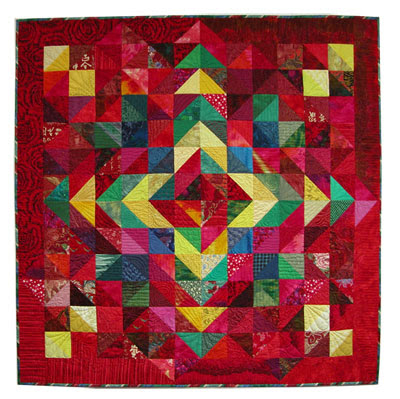
Fresh Salsa, ©2012, finished and bound, 50 x 50 inches

Review:  hints for successfully quilting a pieced quilt top
  • Always make a sample of machine stitching every time you have re-threaded the machine or changed something.
  • Use the correct needle.  I prefer a topstitch needle.
  • Find the darning foot that works best for you. You need good visibility and it must ride high enough to clear the thick areas where the seams meet.
  • Reduce pressure adjustment on the pressure foot, check owner's manual for it's location.  I reduce the pressure to 0 on my machine.
  • Darning feet do wear out.  If it squeaks you might lubricate the foot with a dot of sewers aid. With a small brush, remove excess lint which may be clogging the spring. If you've used the foot for a long time, it may be time to get a new one.
  • Adjust the darning foot so it rides higher by using the wheel on the attachment, by bending the thin bar on top, or using Diane's method of adding an "0" ring to raise it up.
  • Wear quilter's gloves to give good control of the quilt under the darning foot. 
  • A SewSlip creates a smooth slippery surface for easy movement of the quilt on the bed of the machine. If you haven't tried one, they are worth the price.

Happy piecing and quilting
 Ann Fahl 


Friday, November 30, 2012

Quilting Fresh Salsa! part 1

Let the quilting begin.....................................................

Here is my sample flaming spiral.  I don't make pretty samples this is really how I work. Did you want glamour?
Let me tell you this quilt has been a challenge from beginning to end. Beginning in the center, I have planned on quilting a flaming spiral with red thread in the center.  Just to make sure, I practice on a sample first.

The actual flaming spiral in the center of the quilt. I like how the thread subtly blends with all the fabrics
The plan is to work from the center out.  I have taped my paper plan to my sewing table so I can refer to it as I move out to the next row.  This feels very much like following a cross stitch diagram or knitting pattern. So I continue to make small samples, change thread color where needed and keep moving outward.
Here is one of the first yellow arrow segments just outside of red center.
Quilting the yellow arrow segments began with a challenge. I wanted to try quilting it with the red thread, and after sewing one leaf, I realized the error of my plan.  The yellow variegated thread really worked the best.  Notice how it subtly emphasizes the leaves in the quilting pattern. I did the same thing in all four arrow segments.
Detail of dark variegated thread on the green triangles.
I worked around the next ring around the quilt, using yellow and red threads.  Then I got a chance to use the dark variegated thread on the green segment. I was very pleased with how it looked. It took quite some time to quilt my way out to the outer edges of the quilt.  I took my time, stopping for the day when I got tired.

I have found that when I quilt for extended periods of time I start to make mistakes and bad choices.  Since there is no deadline on this quilt, I can just take my time. This is a very relaxing way to quilt.

Along the way, I found that the darning foot was catching on the spots were all the seams come together. Since I have reached my limit of blog space, please see part 2.  Continue to scroll down.
Ann Fahl


Quilting Fresh Salsa part 2


Darning feet for Janome, the center metal foot is adjustable.
One of the monumental challenges I faced is what happens when the machine gets to an area where many seams cross. The foot would get caught on the "lump" and not move.  Then when I tried to force it I'd get a few huge stitches, which didn't look very good.

My goal is to create as even a stitch as possible. It stumped me for a little bit, and I realized why many quilters send their tops out to be quilted! Then I remembered that I could adjust my darning foot. (See image above, the center metal foot.)  All I had to do was spin the little wheel above the needle bar until the foot was high enough to just skim over the lumps.  It took awhile, but I found the correct level. For a complete blog on darning feet check out my earlier blog. For Bernina owners, Diane Gaudynski has a method to alter their darning feet check out her blog to read about this.


Altering the darning foot. If you have the above, clear style darning foot, many people find that it drags above the throat plate, even if the pressure on the foot has been reduced to zero.  This isn't a manufactured recommended procedure but it works:
  • Remove the foot from the machine and slightly bend the little bar down (area shown below the arrow).
  • To do this, turn the foot upside down, and firmly press the bar onto the edge of a table or something substantial to do the bending. Bend it just a little.  You will feel it "give."
  • Do be careful, as you can damage the surface of the table when doing this. Your are responsible, not me.
  • Re-attach the foot on the machine, if it is still dragging, remove and bend it a little bit more.
So much for darning feet, let's get back to the quilting.  I completed the center quilting by continually consulting my plan as shown in blog "Machine Quilting Fresh Salsa." This wasn't the fastest quilting job I've ever done, but I followed the map and finally reached  my destination.

Now it's time to quilt the border. How in the world am I going to quilt it?

Ann Fahl

Friday, November 23, 2012

Variegated Thread with Fresh Salsa?

My three choices for thread in the red areas of the quilt Fresh Salsa.

You may think that selecting thread for a quilting project is a small thing, but it's more important than you think.  It pays off when you make the right selection. So now I've got this top that is a cacophony of red, green and yellow, what thread should I choose?

One of my issues with sending your top out to someone else to quilt is that you usually get one color of thread for the quilting. This would make my quilts so boring! Mattress pads are quilted with white thread, how exciting is that? I choose to use multiple threads, usually depending on the color of the fabric where it will be used. No mattress pads for me.

Learn to machine quilt so you can finish your quilt in the manner you choose!  You can do it!

Auditioning the thread. This is shown using white paper just for illustration. It should actually be done on the fabric of your choice.
 Back to Choosing Thread:

  • Pull out all the colors you think might work.
  • Audition them by unreeling about 36 inches of thread and letting it puddle on the project.
  • Give each thread a rating:  yes, no, maybe.
  • Give a second look to the yes and maybe threads, I throw the ones I like best into a basket or bowl, so they are accessible when the quilting begins.
  • If unsure whether to use thread A or B, sew up a little sample of both; hold each sample up to the quilt top, and this should help you make your decision.
  • There is nothing worse than having to rip out lots of machine quilting, after you figure out, you should have used another thread! I have lots of personal experience in this area.
Solid color or Variegated? This is a personal question. Most of the time I prefer to use variegated threads when I quilt. It makes the stitching more exciting on solid color or mottled fabrics. But if you are using prints a solid color thread may be a better choice.  Audition both types of threads to see which you like best.

Contrasting or Matching thread?  Here are some tips I have learned over the years.
  • Matching thread will be less visible, and will hide irregularities in the quilting.
  • Contrasting thread will really accent the quilting, look great from a distance, but will show everything little booboo.
  • A slightly richer color will subtly enhance the quilting without being too distracting.
  • Lighter threads on deep fabric will usually look good.
  • Dark threads on light fabric are very challenging, all the mistakes will show.
  • The choices are up to you.
Rainbow variegated threads, # 851, 814, 844 from Superior Threads
I have chosen three threads to use on my quilt, most are subtle contrasts with the rich colors in the quilt top. The yellow will look great on the small yellow areas of the quilt, because it mixes several yellow tones there will be subtle contrasts and matching colors here. The red thread includes red, purple, and gold, this makes the red areas more exciting. The darker rainbow thread looks great on all dark fabrics and will make the green areas richer on this quilt top.

The quilting will begin next.

Ann Fahl