Translate

Showing posts with label beading. Show all posts

Friday, November 16, 2012

Machine Quilting Fresh Salsa!

It has been awhile since I've done any machine quilting. When this happens a person becomes a little rusty, so I've decided to quilt an old top that has been lying around my studio for about 10 years. This project should get me back in the swing of things.
Fresh Salsa, top only, © by Ann Fahl 51.5 x 51.5 inches


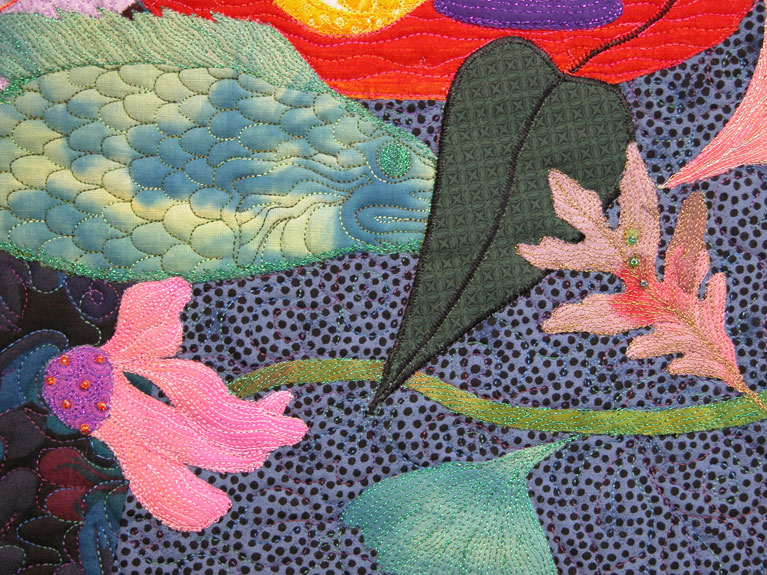
A long time ago this quilt was to be an entry for the special Viking showcase gallery at the IQA show in Houston. To qualify, it needed to be 51 x 51 inches. My sons suggested that I make a quilt about salsa.  I love good fresh chopped tomatoes and pepper as salsa, I could eat gallons of it. Selecting half square triangles in red, green and yellow, I arranged a centrally oriented design, then overlaid a drawing of a tomato cut in half, lined up red iridescent bugle beads on the pencil lines, sewed them all on using NYMO thread, folded the top up and tucked it away in my closet!  I'm sorry, but I never took a photo of the beaded top. You'll just have to believe me that the beads really didn't enhance the over all look of the top.

The red bugle beads that I removed from the quilt top.

Years later, I pulled it out, hung up the beaded top in my studio and decided that the superimposed beaded design didn't enhance the central idea of the quilt, and removed the thousands of beads. Several weeks ago, I got the top out of the closet again; pressed it, blocked it, and pin basted it together. Now I'm machine quilting it.

This is the first time, I have ever quilted a pieced top. Just a pieced top, no beads, embroidery or applique over the surface. For me, this presented a big new challenge. I've thought and thought about how I would quilt it. So I flipped through my recent book on machine quilting, and came up with a plan.

I took a photo of the quilt, and printed 3 copies on 8.5 x 11 paper. I spent an evening doodling on the photo with a black gel pen, and came up with some very specific ideas on how to quilt each defined little area.

Doodling on a paper photo of a quilt, helps me decide what would look best as a quilting design.
Most of the ideas I used, just as is, others have been changed to some extent. Now I'm getting excited, it was time to begin the real quilting.  It has been a long time since I've quilted anything!  But before I can begin I have to select the thread.

We'll talk about thread and quilting next time.  It feels good to be working.

Ann Fahl

Wednesday, May 2, 2012

Meet Ann in Rochester MN

Hi everyone.  I am back from a teaching week in Paducah.  The weather was warm and summery, so different than here in WI. 

You will get my Paducah report in a few days, but right now, the fine people in Rochester, MN wanted me to tell you that there are still openings in two of my classes at MN Quilters 34th Annual Show and Conference:

Beaded Landscape class project

June 14, full day class titled Beaded Landscapes.  This is an easy handwork class that doesn't require much equipment.
Dancing Coneflowers detail 
 June 15-16, two day class, Dancing on Your Quilt.  If you are interested in a thorough class on free-motion quilting, this is it! A machine is required, the second day you will need a small wall hanging to quilt. There is still time to prepare for this workshop.

Here is a link to all the classes at this four day event and quilt show.

Friday, January 6, 2012

What's in the Bag?

This is the bag that stores the miles of bias binding that I have left over from quilt making! I keep a special collection of stripes and plaid fabrics that I like to use for bias. I think bias makes the best and longest lasting binding. (I feel so strongly about this that I wrote a booklet about it.)  There is a strip of almost everything I have in this binding bag, so when I'm auditioning binding fabrics, this bag always gets pulled out.

Last week, in an earlier blog I asked you to vote for how you thought I should bind or face the outer edges of my collage. I initially wanted to face the edges, but something inside of me kept telling me to bind the edges instead. So here is the finished quilt. It is just funky and fun.
Scraps of a Different Color, (c) 2012 by Ann Fahl 32 x 21 inches
I chose to bind it with two of the darker fabrics.  This gives only a slight contrast to the outer edges. I used the blue/green stripe on the left side and the charcoal/red print on the right.

Now that the quilt is complete, I've attached the hanging strips on both the top and lower edge of the quilt back.  The label is attached, which identifies the quilt and me as the maker, and will shortly be uploaded on my website. Also it gets its own listing in my quilt inventory notebook. The digital photography has been taken and stored. My initials always go near the lower right corner. On this quilt it is located near the white spade-like shape.  So it is truly finished. Nothing more needs to be done to document the fact that I made this quilt.
The actual ginkgo leaf I used for the pattern was given to me by my neighbor. She had just been to the library on Lake Michigan and found the leaf.  I immediately cut one out of fabric but never used it.  So this leaf has been pinned up on my design wall for years.  It is good for it to have a real home. I quilted it with a wonderful variegated Superior gold thread.  The purple cup in the corner is from Ginkgoes Galore.
The fish is something I cut out years ago, I think they may have been part of the fish left over that could have been included in Fish Tales! Fish Tales is included in A Black and White Tale.  The coneflower lying on it's side is from the quilt Sewn Together. The little ginkgo leaf is something of which that I've used hundreds.
The pink coneflower is from a large quilt that I am currently embroidering. The cup is from Ginkgoes Galore. The large green hand painted and beaded leaf is from one of my all-time favorites Summer Sanctuary.  I painted hundreds of these coleus leaves and only had 2 or 3 remaining.

As usual, even though I've made a good attempt at using my little fusible scrap shapes, I still have many. It's difficult to close the drawer that holds them.  There will inevitably be more in the future.  It's a challenge to see how I can put them all together.

So here it is for you to enjoy, part of my quilting life in scraps!

Ann Fahl


Sunday, December 11, 2011

Back to the Studio!

Now that everything is back in place, I've returned to work at the machine. I've started quilting on the collage piece. It's wonderful to work in a room full of light.
Basted collage, partially outline quilted with monofilament thread.

One thing I have rediscovered, is that I need to change my darning foot when I'm quilting around beads. I love the little Janome open foot that floats over the surface, but it is awful around beads.
My favorite open toed adjustable foot catches in all the bead!  Frustrating.
In my excitement about trying some of Lyric's beading techniques on her DVD, I forgot about the fact that I quilt after the beading, not before.  The little adjustable foot catches and doesn't move when there is a bead nearby. So... I have to change to my closed toe oval generic darning foot.
Attach this closed toe plastic darning foot, and it rides right on top of the beads.  Life with beads is much easier sewing with this foot.
So change the foot on your machine and the quilting will go much smoother.  And I'm having fun.

Just a reminder that Oreo still has some books left and we can fill orders received this week by Christmas.  A Black and White Tale is the book I illustrated with all of my Oreo quilts and the verse is written by Jacquie Scuitto, the Quilt Muse.  This is a delightful little book, perfect for a gift for any cat or quilt lover, for under $20! Please check it out. Help support a quilter/publisher and her feline.

It's hard to believe that it is only 2 weeks before Christmas.  Happy shopping.

Ann Fahl

Tuesday, November 8, 2011

Oreo Continues to Entertain at the La Conner Quilt and Textile Museum

Summer Sanctuary, is a quilt when first completed didn't include Oreo.  She was added later!
Please just one more blog about my show at the La Conner, it runs through Dec 31, 2011!  This is the longest running exhibit I've ever had. Several people have let me know how much they enjoyed my show and the other 2 ongoing exhibits at La Conner, WA.  Some of you have even sent photos for me to see, it's been great. Believe me, it kills me to not be able to go and see it for myself!

A Quilter's Menagerie, is the first quilt that my husband has ever suggested a title for.
Because the size of this quilt is large, it makes a big impact: whether it hangs in my living room or is displayed at a show. This is a fun one to look at because there are so many details when you step up close to it. The green hand dyed fabrics were died by Dagmar Plenk of Milwaukee. She does are marvelous job of blending the procion dyes to make interesting fabrics.  They seem to glow behind the tree!

This is a smorgasbord quilt that contains at least one of everything that I do: metallic thread, hand bead, machine embroidery and quilting, machine applique, and all the animals and images that I've used throughout my career.

Indiana Memories was included in A Black and White Tale as part of Oreo's adventures
 Although Oreo isn't in this beautiful swan quilt, it has become part of her story in Jacquie's and my book about her adventures.  The quilt makes me feel wonderful, but when I look at the quilting I did, I'm amazed at how much I've improved since making this quilt.
Under the Giant Coneflowers is always a crowd favorite
Here Oreo is walking under the leftover coneflowers from Wow That's Orange. Wow, is also in the exhibit. I'll leave you with a springy quilt on this rainy November Day.  Do you remember Tiny Tim?
Tiptoe, lots of hand beading on this one
But now I realize that this one isn't in the show.  We can still enjoy it anyhow.  I will be talking more about metallic threads in the near future.

Ann Fahl

Tuesday, November 1, 2011

The Beading Begins

Closed toe generic darning foot that Ann prefers for quilting around beads
Now that the embroidery is complete on the collage, I've started the beading. Unlike Lyric, I bead then quilt with a clear generic closed toe darning foot.  This system works well for me. In a much earlier post I discussed the pros and cons of darning feet.

The spot on the collage I chose first was the little wavy red line on the right hand side of the quilt. Check previous post for photos of this collage "Playing with Fabric." I ran a line of short stacks of seed beads.  I chose a size 6 yellow bead for the base and an iridescent red size 11 bead for the top.  This created an interesting line through the center.  Before viewing Lyric's dvd I would have just stitched a single line of seed beads down the middle and that would be it. So I've learned something new that is lots of fun. I love the combination of the two colors, it would be fun with 3 colors too!
Next I couldn't wait to put single bead stacks on the ends of the spiral eyelashes on the lower left corner. I chose the same size 6 red bead for the base and a size 11 black bead for the top.  This adds a nice little touch to the ends.  Although it doesn't show in this photo, the spiral is appliqued with a rusty red metallic thread and the eyelashes are covered with a red metallic size 40 thread.

Next, I decided to change colors and bead the inside of the large lime green leaf at the center top.  I tightly clustered some iridescent seed beads in the center. The leaf was hand painted and left over from my quilt titled Summer Sanctuary. The edges of the pink center already had a little free-motion stitching in a variegated pink thread.

Who knows what is next?

Ann Fahl


Saturday, October 22, 2011

Playing with Fabrics

Last week, I had some free time. I've had the feeling that I haven't played in my studio in a long time.  I've been doing lots of writing, but not really any quilting.  Hmmmm, what am I avoiding?  Lyric's Bead DVD  arrived and I found it quite inspiring, so I decided to make a collage to both bead and embroider.
Collage, pinned and un-fused, it needs squaring up too
 There are two little drawers full of fused scraps in my studio. To begin I created a pieced background with 5 irregular strips of dark fabrics.  From my stash I pulled out a gray, dark print, blue, red and green fabrics of a similar dark value, pieced them together.  This is not an attractive background but it is interesting.

Next I pulled out all those little fused scraps of this and that.  All saved from earlier projects because they were too valuable to throw out! So here is what I have so far.  It's fun, but perhaps a monstrosity!  We'll see.  Mostly it is a learning and confidence building exercise.
Completed collage, fused and embroidery has been started
There are images in this thing, from quilts that have not yet been finished, and pieces that are as old as the hills!
Appliqued spiral from lower left corner, appliqued with red metallic thread and a programmed stitch
I have no idea where this spiral was from, but I have a bunch of them in warm colors. I am doing as much as the embroidery as I can with metallic threads.  If you look at the right hand column of this blog, you will see my newest booklet pictured:  Mastering Metallics.  So I'm using all the tips and ideas I've discovered in the last year or more, working on that project. My next blog will be all about that booklet.

Rhonda's Ginkgo, embroidered with variegated gold thread, but not trimmed up
There is a large hand painted ginkgo fused in the center right area of the collage.  Maybe 5 years ago my neighbor Rhonda, gave me a ginkgo leaf this size that she found when she was at the library.  I cut this hand painted fabric leaf out immediately, but it never found a home, so here it is.  This is why these collages are so much fun.

Off and on, as I make progress on the metallic thread and the beading, I'll show you what I've done. You can see the endless possibilities for bead-work and threads.  We'll see what evolves.  It'll be fun.

Have any of you been to see my show at the La Conner quilt museum?  If you have, please let me know what you think.  I haven't had any feedback yet, and I'm dying to know what it looks like!

Ann Fahl

Monday, October 17, 2011

Bead it Baby!

Today I had a most interesting afternoon.  Lyric Kinard's new DVD called Bead it Like You Mean it arrived in the mail. I had just finished piecing and fusing a medium sized piece; folded all the fabrics, put them away, and cleaned off my cutting table. I'm ready for something new. What a coincidence!
Lyric's new DVD

After running an errand, I decided that the rest of the afternoon would be dedicated to Lyric and beading.  I put the dvd in my laptop and took instruction from Lyric.  I've been beading my quilts since about 1991, and of course, I think I know it all!  Well, I learned lots of things from her because her point of view is so different from mine!

I loved how her backdrop changed with each segment she taught.  Her explanations were well thought out and very clear.  She demonstrated everything at least once. She used contrasting threads so it was easy to see where the thread was inside of the beads and on each project.  I was very impressed, Lyric is a gifted teacher and presenter.

On several occasions she showed small finished pieces that incorporated the techniques she had just  demonstrated in the previous segment. Lyric always had a little bit of a sense of humor as she explained the possible difficulties and challenges that might come along, this made watching the video both fun and informative.

Briefly, this is what she covered:
  • Types of beads
  • Setting up the tools and workspace
  • Seed beads
  • Bugle beads
  • Stacking beads and fringe
  • Creating cages for large pieces
  • How to bead a quilt after it has been finished without any knots showing on the back
She shows a great way to make knots along the way and at the end of your threads. She stresses the importance of making the beads secure.  I enjoyed the segment on making stacks of beads which is something I haven't done, and look forward to adding to my new piece.

This DVD comes in a protective case, was professionally filmed and edited by Bonnie Lyn McCaffery. The DVD can be stopped after each segment, so you can practice the parts that interest you before going on to the next chapter. Bead it Like You Mean It retails for 24.95 plus 5.50 shipping. She accepts PayPal on her blog http://lyrickinard.blogspot.com
Here's a closeup of my collage Still Life with Scraps
In the very near future I will show you my current project titled Still Life with Scraps, when fused, embroidered and beaded.  I am anxious to see how it turns out.

Happy beading everyone.

Ann Fahl