The Border
We're at the end of the project. It's time to quilt the border. Again I have returned to that plan I drew up before all the quilting began.
 | |
| Ann's quilting plan for Fresh Salsa |
I doodled lots of things on the page but here's what I did for the border it is done in two parts.
 | |
| Part one of the border. |
I marked a curvy line in the border, dividing it roughly in half; with a silver pencil. I danced (quilted) this area with leaves, spirals hearts and spirals. Then I went around the outside with some curvy lines that intersect the outside edge. This will make a nice flat edge when I block the piece and trim the edges.
 |
| Finished border. |
The Binding
I found 4 different fabrics that might work for the binding. It's always exciting to get to this point, because I know the quilt is almost done. Put some careful thought into your fabric choice, because this is like a frame on a painting. Think of it as the sparkle on the edge. When you look at your top, do you want a contrasting edge or a subtle edge? For me, it depends on the quilt and my mood at the time. For more info on bias binding, may I recommend my booklet on binding. You may think differently about it after reading the 28 pages that I've written.
 |
| Here are the fabrics I though might work for the binding. |
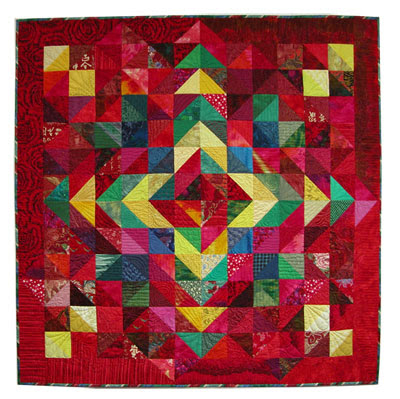
So which fabric won? I thought it would be the green check on the left! The red/pink/yellow multi was too busy.The green/blue/red stripe was a decorator chintz looked great. I went out and purchased the small stripe on the right. It had a sense of humor and pulled out all the colors in the top, but when placed on the quilt itself it was more pastel than I wanted. So the winner is........the green decorator chintz.
 |
| Fresh Salsa, ©2012, finished and bound, 50 x 50 inches |
Review: hints for successfully quilting a pieced quilt top
- Always make a sample of machine stitching every time you have re-threaded the machine or changed something.
- Use the correct needle. I prefer a topstitch needle.
- Find the darning foot that works best for you. You need good visibility and it must ride high enough to clear the thick areas where the seams meet.
- Reduce pressure adjustment on the pressure foot, check owner's manual for it's location. I reduce the pressure to 0 on my machine.
- Darning feet do wear out. If it squeaks you might lubricate the foot with a dot of sewers aid. With a small brush, remove excess lint which may be clogging the spring. If you've used the foot for a long time, it may be time to get a new one.
- Adjust the darning foot so it rides higher by using the wheel on the attachment, by bending the thin bar on top, or using Diane's method of adding an "0" ring to raise it up.
- Wear quilter's gloves to give good control of the quilt under the darning foot.
- A SewSlip creates a smooth slippery surface for easy movement of the quilt on the bed of the machine. If you haven't tried one, they are worth the price.
Happy piecing and quilting
Ann Fahl
1 comment:
Looks great, thanks for the tips!
Post a Comment