Translate

Showing posts with label red and green quilt.. Show all posts

Tuesday, April 1, 2014

Another Book Finished!


My great grandmother Nannie Harvey, 1950s, standing in the garden which is still beautiful today.

There isn't any quilting in my life at the moment.  I've finished writing The History of the Harvey Cottage. It has 85 pages and over 100 photographs and maps.This particular adventure began in 2005, and the completed manuscript is now in the hands of a friend who will proofread it for me.  Soon it will go to the printer and become a real book for the members of my family to read.

The cottage property was purchased by my great grandparents in 1927 and has been in the family ever since. It is a place that has much influence on who I have become; and inspired many quilts along the way.

In my research, I found this photo of my great grandmother standing in the garden that adjoined the cottage. Her name was Nancy Jane Culbertson 1870-1959.  She was very gentle with her great grandchildren, but she never smiled!  I will always treasure this picture of her. Oh yes, she possibly is the maker of the red and green tulip quilt which I am still restoring.


Friday, October 18, 2013

A New Look for an Old Block

As I begin this blog, I've got 2.5 blocks finished.  Working a little bit each evening, I can re-applique one block in a week.  It's important that this be a NO pressure project, just sewing a little if I feel like it.  Those are my guidelines.  No more high pressure projects that have to be done by a due date!  Quilting should be enjoyable and relaxing.  I've been missing the "relaxing" part for the last few years. And this quilt is for me, not for a show with entry deadlines and qualifications.

When I began my quilting career in 1978, I quilted for about 3 hours every evening. When I say "quilting" I mean all the hand work; applique, quilting and finishing the binding.  I looked forward to this part of every day.  When my children came along, I didn't get 3 hours anymore, but after they were tucked in, I sat down with latest quilt. This was a little bit of my stitching heaven.

Since I've made the switch to being a machine quilter, I've had nothing left to do in the evening, maybe sewing on a label or finishing the occassional bias binding. So this old quilt is fulfilling a need for me.
The first block re-appliqued is one on the outside corner.
When I stepped back from the completed block, I said, "wow."  What an amazing change. I can only imagine how the quilt will look when it is done.  There will have to be some requilting on top of the applique, but that's too much for me to think about right now. Tomorrow is another day. Didn't Scarlett say that?
Detail of the the stems and leaves.
 In the previous post, I talked about how the leaves needed to have points and the stems should be laid under the flowers.  So here is what I meant.  I am also using matching thread colors so little boo-boos don't show. This is quite pleasing to the eye.
A closeup of one of the appliqued tulips. Notice how nice the stem sits under the flower.
I am not restoring this quilt for a museum, I'm fixing it for myself, so I'm taking some liberties with my techniques.  I am using hand techniques that I like to use, and are high quality, not duplicating the stitching by the original maker. So I'm using matching thread.

Next time I'll show you a block in progress.

Ann Fahl


Friday, October 4, 2013

Where do I Begin?

These blocks are lovely and I've always liked the color choices the maker used.  I've made hundreds of quilts, done lots of hand work in my life, but never restored one like this. Where do I begin?
I think it is wise to remove one old piece at a time. The old stitching holes and pieces of old thread will mark the spot where I should sew the new piece on.  Beginning with the 3 center stems. The original maker used bias strips. So I constructed enough green bias all at one time to finish all 20 blocks.  I cut 1.5 inch strips, pressed them in half, then almost in half again to create .5 inch strips with both edges folded under, and easy to applique. I made 560 inches of bias! That should be enough to complete all the stems.

Next is the leaves. As I look at what is left of the blocks I see there isn't much consistency of size.  So I traced over the tiny leaves at the top and the larger leaves at the base to create plastic templates.  Wow, I haven't made templates in years.  I cut out enough just for several blocks so I can get going with my project. I'll cut more as needed.

Now the tulips, each consists of a red center and two green petals.  So I've done the same thing, made plastic templates and cut out enough for only 2 blocks.  I'm anxious to get going.
Tulip pieces in both red and green have been cut with scissors, like the original maker.
I will work in this order, removing all or portions of the damaged piece first:
  • Middle, right left stem
  • Lower green corner triangle
  • Middle red tulip piece, then 2 green side pieces
  • Tiny top leaves on both sides of the stems
  • Large lower leaves on each side of the stems

As I work, I'll pull out the old stitches and look for places on the front and back that may need repair.  I'll make those using some muslin that is well washed and matches the white background pretty well.

The quilt was appliqued with white thread.  This was done for many years, and was traditional to use white. But I love color and own thread in hundreds of colors so I will be appliqueing with matching red and green thread.

Hmmmm, each block times 20.  That's a lot of blocks.

Ann Fahl

Friday, September 13, 2013

Saving an Old Quilt

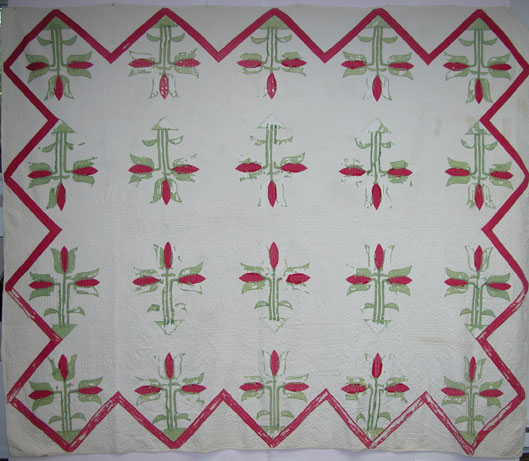
So here is the quilt, it's a big one, 85 x 102 inches.  The blocks, set on point are 14 inches square. The applique is by hand, and has been done and repaired by several hands.
Red and Green Tulips, a family quilt, no date or maker
As you can see, the red fabric is in much better shape than the green. The green can literally be just pulled off and it's in your hand.  More of it is gone, than present! The condition of the quilt is POOR. Because it is from the cottage, it is very special to me and worth spending the time to rescue.

What is the story of this quilt? No one living in my family knows anything about it.  But here is the story I have put together, based on a few facts. 

My great grandfather was one of the founders of a building and loan in Marion IN, he went to the same Presbyterian Church as Marie Webster. He was a good businessman and seemed to know lots about real estate ownership and management. Then the great Depression hit Marion and the USA.  He then became an owner of too many houses, and they all needed to be repaired and perhaps rented to keep the building and loan afloat. These years were difficult for everyone.

Grandpa must have taken some items in trade instead of rent, when the tenants couldn't pay. I think that is where this quilt came from.  This beautiful appliqued piece was something that had been treasured and had some value to the original owner, so it was given in lieu of rent. It had been well cared for and it was probably old at the time of the Depression. This is why I think it came from a family in Marion IN, but who knows where it was originally made.

Another theory is that when people left these homes, some of their belongings were left in the buildings. But I cannot see a woman leaving a precious quilt in a home she was leaving.  This still may have happened. I'll never know these details!

Grandpa bought the cottage in 1927 and owned it until about 1940.  Over the years all kinds of things turned up at the cottage, it had a big porch and living room and 4 bedrooms that needed to be furnished. This quilt was one of the things that was in the big trunk upstairs, and I've kind of grown up with it.

Now it is time to begin the time consuming task of repair. I'm looking forward to this part.

Ann Fahl