Translate

Showing posts with label applique. Show all posts

Saturday, May 9, 2015

Mother's Day Treat

Trillium in the Sun, quilt by Ann Fahl, 43 x 43 inches
 This weekend I was going to treat myself to a gardening weekend.  This means no household stuff, no family history research, just playing outside in the dirt!  All winter I look forward to this time of year and now it's here.

It turned cold last night, a new front came through and it rained all night.  There will be no gardening today while the temperature is in the 40s.

The good news is that the trillium are blooming and they are wonderful. My woods is full of these lovely white flowers. When this happens I try and design another trillium piece in my head.

Ann Fahl

Wednesday, February 11, 2015

A New Old Quilt for Valentine's Day

It was last week when I completed the last stitch in the new binding around this restored 1880s quilt.  I've been celebrating by sleeping under it each night. Because of its wool batting, it's nice and warm.
Here's the finished quilt on the bed.  I made pillow cases out of muslin with a matching 2 inch red stripe to match.  I think I'll make another set using the green fabric.
When I first started working on this quilt many of the blocks looked like this, but this one was the worst.


So the next generation of the family knows what has happened to this quilt I printed a rather lengthy history on fabric and sewed it onto the back.  If you want to read what I said, it follows below:


Harvey Family
Red and Green Tulip Basket Quilt
85 x 102 inches
There are no family stories or oral history about this quilt, but there has been some discussion of who might be the original maker.  As a young girl I remember that this quilt was displayed on the brass bed in the bedroom on the main floor of the Harvey Cottage at Winona Lake, IN.  In the late 1960’s it was a beautiful quilt but in great need of repair.

In September of 2013 I began the task of repairing it. On January 2, 2015 I placed my last stitches in the binding. This was a labor of love.

The original white background fabric had beautiful hand stitching worth preserving, but the red and green fabrics were in terrible condition. The green had so many holes in it, I could just pinch and pull it off the quilt. I re-appliqued brand new matching red and green fabrics over each block and the outer border. 

There were numerous little holes in the white areas, both on the front and the back. I appliqued new muslin patches over these areas to give the quilt more stability. As I worked I marked the areas that needed to be re-quilted, and that was all stitched by hand. A new binding was sewn right over the original binding to protect the fragile edges. 

This quilt has now been transformed into a beautiful piece, the layout of the blocks, the hand quilting and the contrast of the fabrics is stunning. I’m glad that I was able to preserve it for future family members.

A quilt historian told me that this tulip quilt was probably made in the 1880s. I’d like to think that my Great Grandmother Nancy C. Harvey (1870-1959) sat around a quilt frame with her four sisters: Belle, Alice, Lida and Madge Culbertson, to finish it for her wedding in 1891. There were many hands that stitched on this quilt, some were the original stitchers and some probably sat on the porch to make repairs in more recent years.

Inside the quilt is wool batting and I know that they had sheep on the Culbertson Farm in southern Indiana. The wool fibers had to be carefully placed on the underside of the top to give it loft and warmth.
Ann Harvey Fahl,
Quilt artist and family historian

Happy Valentine's Day.

Friday, March 14, 2014

The Order of Stitching

After all the pieces are fused into position, I work on the embroidery and applique next.  First I begin the with layer that appears to be on the bottom.  So I'll begin with the edges of the blue ginkgo leaf first.  Why?  Because I'm lazy, and don't like to spend lots of time back tacking and pulling threads to the back and tying them! If I do the bottom layer first, then another layer of stitching will eventually cross the ends, and hold them in place.  When I get to the top layer, then I'll have to do a minimum of stitching in place or pulling threads to the back.

Choose your thread carefully. I always use shiny polyester embroidery threads usually variegated ones. Remember that my name is Ann Variegated Fahl.  I love color change.  Unreel an arm's length of thread and let it puddle on the fabric.  Do you like it? If you aren't sure, do a little test stitching first on a scrap to avoid having to tear out lots of embroidery.

Note*  The photos below were taken after the quilt was finished.  However the the embroidery and applique were actually stitched only on the quilt top.

Closeup of Ginkgo Leaf, Florentine Edge Applique
The Florentine Edge Applique is a technique I have created using a free-motion zigzag stitch and a hoop. It gives a versatile wide edge treatment that I just love.  I have written a booklet on the subject of Applique, which gives complete instructions on this technique.  Or you may also refer to a 2013 article that I wrote in the American Quilter magazine fall issue.

Also in a hoop I stitch the veins in the lily pads. I've used a blue variegated thread for this.
Next, while I still had my embroidery hoop close by, I covered the cattails, ducks heads and bills with straight free motion embroidery. Then I basted the layers together, and will finish the rest of the details in the quilting phase of the quilt. Before I do more decorative quilting, I outline every shape in the center of the quilt with mono filament thread.

Here is Ethel. I've quilted her with a brown variegated thread. She has so many different fabrics, one thread choice acts as a unifying device. I've tried to quilt near the edge of almost every feather.
I had to use two different threads to quilt Norman.
I used a shiny white thread on the wings and slender white detail on his neck. Then I used the same variegated brown that I used on Ethel's wings.

Quilting in the pond.
I chose a light blue variegated thread to quilt the pond.  It is the same thread used for the Florentine edge applique. I love adding a little spiral here and there.  Once the middle is completely quilted then I stitch around the inner edge of the border and then quilt the edge.
Detail of the top edge of quilt
I used lots of curls and coils in the green background, using a blue variegated thread.  Then on the edge I stitched using a dark variegated combination thread on the border. 

I blocked the quilt, trimmed the edges and bound the edges.  You can see the finished quilt on my website.  On Ginkgo Pond.

Next time I'll talk about another ginkgo quilt.

Ann Fahl


Wednesday, January 8, 2014

Sunset over Winona Lake

January 8 is my aunt's birthday. She is not just any aunt, we are rather close in age, and over the years we have become good friends. We both love Winona Lake.

As a family historian, I've written about and photographed most of my relatives, so I know lots about them. One of the things Nancy loves is her aprons.  When at the cottage, she'll have her apron on, and you know she is ready for anything. She raised 4 children and has quite a few grandchildren, so she has experienced a lot in her life!

Nancy Harvey at the cottage
When at the cottage, life is very informal. During the summer,  people are dressed in anything from bathing suits dripping wet to their Sunday best. Most likely Nancy is wearing her apron.

Over the last several days I've designed and sewn a new apron for Nancy. This one is called Sunset over Winona. There will only be one of these.  I pieced together fabrics from my stash that look like the sunset.
Sunset over Winona Lake, the apron.
I love it when I can go into my stash and just pull all kinds of stuff out, and make a complete project without having to go to the store.  When I was in 7th grade and took my first Home Economics class we made an apron using just one yard of fabric. I've always kept the diagram we used to cut the pieces.  The only difference is that the body of the apron uses 5 strips of color sewn to a wide band of blue at the bottom.  I couldn't stop here, I had to add a water lily to it.
Here is the hem detail
Since an apron is used and washed frequently, I chose to fuse the the lily and pad, then machine applique it in place.  I zigzagged the seam allowances and top stitched them. It should hold up for a long time.
Pocket detail
The yellow needed to be repeated somewhere, so I added a water lily bud to the pocket. I used variegated threads for the applique, both a yellow variegated and my favorite green variegated rainbow #809.

This is kind of a wild splashy apron, I'm certain that all the spots and spatters from cooking won't ever be noticed.  I know she'll like it.

Happy Birthday Nancy!

Ann Fahl


Friday, November 8, 2013

Restoring the White Background fabric

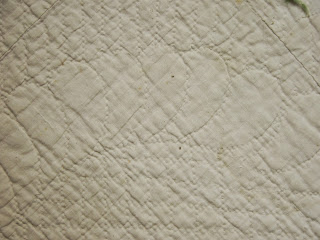
Close up of one of the simple feathered circles in the alternating blocks.

We've pretty much discussed everything about the tulip blocks.  As I've been working on them, I've noticed areas in the white fabric that will need some attention:
  • There are some small holes or splits
  • There are places where the hand quilting needs to be filled in.
  • Soiled areas.
My friend Linda gave me a great tip on how to handle the background repairs; and that is to lay it out on a table or floor and mark all the places that need attention with a safety pin or a loop of colored thread. Do this on the front and the back side.

Now as I work on appliqueing the blocks when I see those little places I will mark them as I go along.

Still Quilting.

Ann

Friday, November 1, 2013

Red and Green Tulip Quilt.........it's history


Here is Oreo sitting on the quilt, with six blocks appliqued.
Here is what I know about the history of this quilt.  It was at the cottage in Winona Lake IN.  It was probably obtained from someone in Marion IN where my great grandparents lived.

My friend Linda Honsberger (appraiser and quilt historian) looked at my quilt and was able to tell me quite a bit about the history of my Red and Green Tulip Quilt.

This is what I've learned about it's beginnings:

  •         It is of German or Mennonite origin
  •      Possibly made in Ohio
  •         Made about 1880
  •         Has wool batting, very thin in places
  •         Hand appliquéd with white thread
  •         Turkey red fabric is in rather good condition.  Only the red outer border has some bad spots.
  •         Green fabric has almost totally disintegrated.  The dyes used at the time, have weakened the fibers so it literally just pulls away easily with your fingers.
  •      It has white cotton binding cut on the straight of the grain, 3/8 inch wide.
  •         The hand quilting is decent. The alternating blocks have a simple feathered circle. The  quilting in the appliquéd blocks and border is straight lines.
  •         The white background fabric is in fairly good condition, there are a few splits in the fabric, so I will repair those by appliquéing well washed muslin over them. 
  •      It was likely a 13th quilt, or someone's wedding quilt, or good quilt that was saved for special occassions.
  •      Sadly, we do not know the maker.

Friday, October 25, 2013

The Actual Rescue of a Quilt Block

We will begin the repairs on this block.

Earlier I talked about what order I would re-applique the blocks. It's not very exciting, but I like to begin with the three stems.  I'll take you through this, step-by-step.  It is important that you remove only one piece at a time; replace it; and then remove the next piece.

Why? because when you remove a piece there are little holes and short threads remaining, to show you exactly where you should stitch the new piece.  If you take off too many pieces at a time you'll lose the markings.  This is old fabric, I don't want to mark with a pencil if I don't have too.

Carefully removing the center stem to be replaced.
I use a seam ripper or a tiny pair of embroidery scissors to do the removing. Make sure you have good light on the project. Remember these threads are old and the fabric underneath is fragile so it's important not to just rip and tear things off. Be gentle.

As I remove threads along the stem, I have to clip some of the stitches on the nearby leaves, but I let them stay in place. Then I replace the center stem with a bias strip. Now you can pull out all the little old snipped threads that were marking its position. Next I remove the right stem and replace, then the left stem and replace. By this time the four leaves are almost hanging by a thread. So one at a time, I remove and replace until all four leaves are finished.
The stems have been replaced with new bias strips, new leaves have been appliqued and the lower triangle has been added.
Now it is time to work on the tulips. The red fabric is shabby, but still firm. So I will leave it in position unless there is a big lump at the outer tip of the flower. If this is the case I'll snip a few threads on the tip, and remove the lump. Now, I'll pin the red tulip petal over the existing red piece and applique it into position. 
Red center petal pinned;  only the upper tip is needle turned and appliqued; remaining edges are raw.
Notice that the lower tip of the red center is folded under. I just pin it in place. You'll notice the fold is aligned with  the lower edge of the green petal. You can also see the black top of a pin marking the edge of the green petal on the left side.

After the one center red petal is pinned and sewn; I lay on the two green side petals. Sometimes the original petals are in such bad condition that they get totally removed. Others that aren't too bad, I'll just applique the new petal over the old.
Green petal appliqued on left side of tulip
Now all that is left is to applique the right green petal.  There are 3 of these tulips in each block.
As of Oct 12, 2013  I have completed 6 blocks and some of the border. I am pleased with my progress.

Still stitching.

Ann Fahl


Friday, October 18, 2013

A New Look for an Old Block

As I begin this blog, I've got 2.5 blocks finished.  Working a little bit each evening, I can re-applique one block in a week.  It's important that this be a NO pressure project, just sewing a little if I feel like it.  Those are my guidelines.  No more high pressure projects that have to be done by a due date!  Quilting should be enjoyable and relaxing.  I've been missing the "relaxing" part for the last few years. And this quilt is for me, not for a show with entry deadlines and qualifications.

When I began my quilting career in 1978, I quilted for about 3 hours every evening. When I say "quilting" I mean all the hand work; applique, quilting and finishing the binding.  I looked forward to this part of every day.  When my children came along, I didn't get 3 hours anymore, but after they were tucked in, I sat down with latest quilt. This was a little bit of my stitching heaven.

Since I've made the switch to being a machine quilter, I've had nothing left to do in the evening, maybe sewing on a label or finishing the occassional bias binding. So this old quilt is fulfilling a need for me.
The first block re-appliqued is one on the outside corner.
When I stepped back from the completed block, I said, "wow."  What an amazing change. I can only imagine how the quilt will look when it is done.  There will have to be some requilting on top of the applique, but that's too much for me to think about right now. Tomorrow is another day. Didn't Scarlett say that?
Detail of the the stems and leaves.
 In the previous post, I talked about how the leaves needed to have points and the stems should be laid under the flowers.  So here is what I meant.  I am also using matching thread colors so little boo-boos don't show. This is quite pleasing to the eye.
A closeup of one of the appliqued tulips. Notice how nice the stem sits under the flower.
I am not restoring this quilt for a museum, I'm fixing it for myself, so I'm taking some liberties with my techniques.  I am using hand techniques that I like to use, and are high quality, not duplicating the stitching by the original maker. So I'm using matching thread.

Next time I'll show you a block in progress.

Ann Fahl


Friday, October 11, 2013

Thoughts on Workmanship

Here is a look at the beautiful stitches on the red tulip pieces.  This woman's workmanship was beautiful, and I don't find the white thread too distracting. At this time in history, a tiny whip stitch was usually used with white thread no matter what the color of the applique.
Small white whip stitching holds the red petal in position

The green fabric is just about gone, so it is hard to tell how the stitches actually looked. There are some whip stitches but there is other sewing with light green thread.  It seems like a different person sewed on the green; or made repairs in later years.   

Look at how the stems are folded over on top of the tulip.  This drives me nuts. Why didn't the maker slip the end under the flower? It would have looked so much nicer and would have been less trouble.
There is a lump at the base of each flower where the bulky stem was turned over.


See how the leaves were almost too big to fit in the spaces, so the maker stuck the ends under or over the stems to fit them in!  This gives an awkward look.  I will trim my leaves to a smaller size so they fit in each space, and give them points at both ends. Look at the photos above and below.
The base leaf on the left was laid over the stem. The leaf on the right barely touches the stem, this is more pleasing. 
The blocks are approximately 14 inches square. What I am seeing is that our skill level and tools we use in quilting today are so far superior to what women used years ago.  Our quilts are so much easier to make.  Also we have good light in our sewing areas and homes which even in the 1950's we didn't have.  

I don't mean to be too critical of this woman's work, it is a beautiful quilt. But the difference is in how far we have come in the quilting world. These little details make a big difference in the final appearance of the quilt.  I think I've been competing in judged shows too long.

At the time I am writing this post, I've actually appliqued 2 blocks and they look beautiful.  Next time, I'll show you the difference!