Translate

Showing posts with label small quilts. Show all posts

Friday, May 24, 2013

Frozen Winter Projects

Usually after the holidays I find it difficult to begin a new project.  This year I had numerous things going at once.  Early January I flew from frozen Wisconsin to Florida to visit friends and relatives.

First I visited my cousin Janet who lives outside of Orlando.  We spent 3 days together. It was wonderful to be with her, and we could be outside in shorts and t-shirts!  So I made a tiny quilt for Janet and her husband.
Winona Winter 2013, quilted photo by Ann Fahl, © 10 x 8 inches
When one doesn't feel too creative it is a good idea to make something small.  So I chose one of my favorite photos of Winona Lake, IN; (Janet and I both love Winona) added two borders and quilted the photo for them.
Winona Winter 2013 detail
I love how the quilting accented the piles of ice along the sidewalk.  I used a variegated gray/brown for the dark areas and a solid light gray for the snow.

After my visit with Janet, I drove up to Amelia Island and visited my friend Sally. Sally was the designer for my book A Black and White Tale.  She was staying at a wonderful house right on the ocean. The view was absolutely amazing. Again, I was comfortable wearing shorts and t-shirts.  It gives you a great sense of freedom, not having to wear heavy winter coat, scarf and boots. Sally is always taking photos with her iphone. Following her lead, I took some too.  We had a short but adventuresome visit. We shopped, ate all our meals out, and even took a boat tour of the area.

Vacation With Sally, a quilted photo collage by Ann Fahl, ©12 x 10 inches
For Sally, I made a photo collage, using some of the pictures I had taken, and one that Sally took. One of the strong visual elements of the beach house was the stairway over the dunes.  You will see it on the right side.  On the left is a sliced up photo of an old shrimp boat that is still operating on Amelia. The dark diamond shape is a picture by Sally that was an image of a beautiful hosta-like plant that I was waiting to see bloom.  It bloomed after I flew home, so Sally sent me the photo. Behind the diamond is a look down the shoreline.  Above it all is a combo of sky-scapes that I layered on top of each other.

Detail of the diamond photo taken by Sally
This was great fun, experimenting with Photoshop and transparencies at many levels.  After it was printed on "Printed Treasures" fabric, I added a double border and quilted it.
Detail of the boardwalk and stairway
For the quilting of all the above pieces I begin with monofilament thread in the top and bobbin.  With feed dogs down and darning foot installed, I outline the basic structure of the quilt. Then I begin adding colored threads.  I have found that using the Bottom Line on the top is great on photos because it is a fine thread, and allows the photo details to be seen.

When heavier thread work is called for I use whatever I want! Both the above quilts have wool batting and are bound with bias binding.  Bias makes a finer, longer lasting edge that using strips of fabric cut across the grain!

By the time I completed both of these quilts, I was ready to begin something a little bigger.  This will be the subject of my next blog.


Monday, February 20, 2012

How to Fold and Store Quilts!

It's been quite awhile since I taught at a guild in Virginia.  Before my lecture, I had dinner with about 6 women, and one of them mentioned how she folded and packed her quilts.  She folded her quilts on the bias instead of the the straight of the grain.  The bells and whistles went off in my brain--this was the answer on how to safely pack quilts when I teach and send them to exhibits.  Of course it also works when quilts are stored in a closet somewhere.
One of Ann's quilts folded and ready to pack, ship or store in the closet
Everyone loves "show and tell" at their quilt meetings, I've probably been to hundreds.  I could just cry when someone opens up their quilt and there is a hard crease right down the middle in two directions.  Once that crease is set, over time, it will never come out.

With the consent of that quilter in Virginia, I wrote and published a short article on folding for Quilter's Newsletter Magazine in the January 2006 issue.  This little article has gotten more comments, feedback and requests to reprint in local newsletters, than anything I have ever written.  So if you are tired of having heavy creases down the middle of your quilts, this is what you should do:
Lay your quilt on a table, bed or on the floor.  Fold one 
corner across the quilt on the bias.
Fold up the next corner, the same way.
Fold the third corner, the same way.

 Then fold the last corner as shown.
 The finished package should look something like this.
If the package still needs to be made smaller, fold again much the same way.  Or open it up and refold.

When you open up the quilt after it has been folded like this, the folds will soften and disappear in a very short time.  Why?  Because every fold that has been made is a soft one, the fibers aren't folded or crimped  on top of each other--always at an angle.

All quilts should be folded on the bias, or rolled to prevent permanent creasing. I heartily recommend this method.  When sending to a show, it will arrive without the big crease in the middle, it will look much better.  The same goes for antique quilts, it may be too late to "save" some of them from heavy creasing because the damage has already been done.  In general even old quilts will be happier folded this way.

Practice this a couple of times and you'll figure out how to do this.  Even blankets and bedspreads can be folded and stored this way too.  Go to your closet and find something to fold!  You will be impressed.

For a more recent post please see this blog.

Ann Fahl

Sunday, January 29, 2012

Walk Through Ellen's Garden: a winter treat

The other day, a copy of Thread Magic Garden, by Ellen Anne Eddy arrived.  What a beautiful book.
Water Lily Sunset, quilt by Ellen Anne Eddy
When I opened the book and saw the title page and table of contents I was hooked.  Beyond these first pages the entire book is rich with color, detail and texture of her wonderful new work.  Ellen and I think the same way about our flowers and gardens:

"My garden intoxicates me.  The sights and smells, textures 
and sounds are my daily retreat.  Just as I slip into the garden, 
the garden slips into my quilts."
What a lovely thought, I wish we were closer to spring. 

Ellen's work has changed some since her first book, Thread Magic. At least for this new book, her focus is on her garden and the creatures that live there.  Her new quilts are small jewels, each one better than the next.
Snail's Pace, quilt by Ellen Anne Eddy

She is still blending sheer fabrics with her dramatic hand dyed fabrics; and has added commercial lace, trims and loose fibers.  She explains in rich detail how she accomplishes each look.  Ellen includes:
  • tips
  • dos-and-don'ts
  • types of stitches
  • color theory
  • blending threads and colors
  • composition
  • creating a visual path
  • shading
  • angled stitching
  • and the list goes on. 
Her approach is very thorough and understandable for anyone wanting to try her free-motion techniques.

Whether you are interested in thread work or not, this book is a visual delight. CandT's book designer did a great job of including large detail shots throughout the book. It makes me drool!

Book details:  full color, 111 pages, 8.5 x 11 inches, $28.95, available as an eBook from CandT Publishers.  The book is now available in quilt shops, from CandT, and from Ellen's website.

Cover of Ellen's new book


Support your local quilt artist.  Ask your local quilt shop to carry the book.  It will soon become a "must have" for everyone interested in thread work.

Ann Fahl, an envious thread artist!


Friday, January 6, 2012

What's in the Bag?

This is the bag that stores the miles of bias binding that I have left over from quilt making! I keep a special collection of stripes and plaid fabrics that I like to use for bias. I think bias makes the best and longest lasting binding. (I feel so strongly about this that I wrote a booklet about it.)  There is a strip of almost everything I have in this binding bag, so when I'm auditioning binding fabrics, this bag always gets pulled out.

Last week, in an earlier blog I asked you to vote for how you thought I should bind or face the outer edges of my collage. I initially wanted to face the edges, but something inside of me kept telling me to bind the edges instead. So here is the finished quilt. It is just funky and fun.
Scraps of a Different Color, (c) 2012 by Ann Fahl 32 x 21 inches
I chose to bind it with two of the darker fabrics.  This gives only a slight contrast to the outer edges. I used the blue/green stripe on the left side and the charcoal/red print on the right.

Now that the quilt is complete, I've attached the hanging strips on both the top and lower edge of the quilt back.  The label is attached, which identifies the quilt and me as the maker, and will shortly be uploaded on my website. Also it gets its own listing in my quilt inventory notebook. The digital photography has been taken and stored. My initials always go near the lower right corner. On this quilt it is located near the white spade-like shape.  So it is truly finished. Nothing more needs to be done to document the fact that I made this quilt.
The actual ginkgo leaf I used for the pattern was given to me by my neighbor. She had just been to the library on Lake Michigan and found the leaf.  I immediately cut one out of fabric but never used it.  So this leaf has been pinned up on my design wall for years.  It is good for it to have a real home. I quilted it with a wonderful variegated Superior gold thread.  The purple cup in the corner is from Ginkgoes Galore.
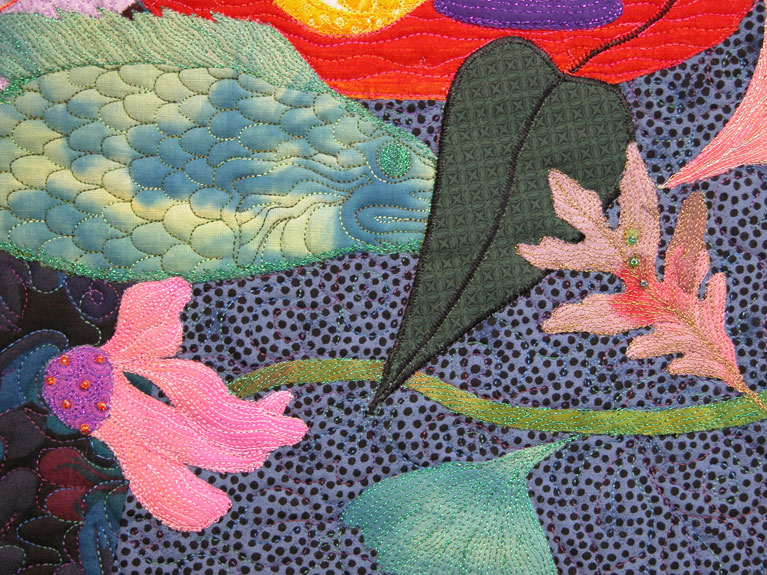
The fish is something I cut out years ago, I think they may have been part of the fish left over that could have been included in Fish Tales! Fish Tales is included in A Black and White Tale.  The coneflower lying on it's side is from the quilt Sewn Together. The little ginkgo leaf is something of which that I've used hundreds.
The pink coneflower is from a large quilt that I am currently embroidering. The cup is from Ginkgoes Galore. The large green hand painted and beaded leaf is from one of my all-time favorites Summer Sanctuary.  I painted hundreds of these coleus leaves and only had 2 or 3 remaining.

As usual, even though I've made a good attempt at using my little fusible scrap shapes, I still have many. It's difficult to close the drawer that holds them.  There will inevitably be more in the future.  It's a challenge to see how I can put them all together.

So here it is for you to enjoy, part of my quilting life in scraps!

Ann Fahl