Translate

Showing posts with label metallic thread. Show all posts

Friday, October 19, 2012

Embroidery on The Sun God's Garden

After spending so much time and thought on the composition of a quilt, it's fun to actually begin the machine work. For me, the embroidery is what adds rich texture, and holds all the pieces in position.  I do this in a hoop so I don't need any stabilizer underneath the pieces.  This creates a softer quilt top and allows the quilting (over wool batting) to add more dimension to the finished product. For more information on how Ann handles her embroidery refer to her book, Coloring with Thread.

Detail of Scraps of a Different Color showing rejected embroidery pattern
Being a coneflower fan, I wanted to begin with them.  I had already decided how I wanted to embroider my angular flowers. First I had experimented on another quilt where I discovered that I didn't like my first idea. This is why it is so important to test out ideas first, so problems can be avoided on major pieces of work. So I had to rethink my ideas and this is what I came up with.
Embroidery and quilting detail of coneflowers with honey bee
Each petal was detailed in the opposite direction with a variegated pink thread. This was a simple plan which I could easily accomplish, yet different than anything I had done before.

The papyrus was another challenge.  How will I embroider them?  I chose to use metallic blue and green thread to detail the heads, and gold thread for the sepals. This was lots of fun and a challenge to work with metallics.  I had finished writing my Mastering Metallics booklet by this time, so I tested out some of my suggestions! The detail on the curved edge is really pleasing and adds richness of texture.  I also love the little circles that hold the seeds in the papyrus head.
Harry becomes the focal point using Superior Thread's Midnight Rainbow #844
 And then there is Harry. I knew all the embroidery on the bird was going to make him come to life. I didn't worry too much about individual feathers, I just wanted texture.  Midnight Rainbow add the color I wanted over the double dyed blue/purple fabric. Notice that the grass behind the bird adds more depth to the quilt.

Now that the embroidery is complete, all that remains is the quilting.

Friday, January 6, 2012

What's in the Bag?

This is the bag that stores the miles of bias binding that I have left over from quilt making! I keep a special collection of stripes and plaid fabrics that I like to use for bias. I think bias makes the best and longest lasting binding. (I feel so strongly about this that I wrote a booklet about it.)  There is a strip of almost everything I have in this binding bag, so when I'm auditioning binding fabrics, this bag always gets pulled out.

Last week, in an earlier blog I asked you to vote for how you thought I should bind or face the outer edges of my collage. I initially wanted to face the edges, but something inside of me kept telling me to bind the edges instead. So here is the finished quilt. It is just funky and fun.
Scraps of a Different Color, (c) 2012 by Ann Fahl 32 x 21 inches
I chose to bind it with two of the darker fabrics.  This gives only a slight contrast to the outer edges. I used the blue/green stripe on the left side and the charcoal/red print on the right.

Now that the quilt is complete, I've attached the hanging strips on both the top and lower edge of the quilt back.  The label is attached, which identifies the quilt and me as the maker, and will shortly be uploaded on my website. Also it gets its own listing in my quilt inventory notebook. The digital photography has been taken and stored. My initials always go near the lower right corner. On this quilt it is located near the white spade-like shape.  So it is truly finished. Nothing more needs to be done to document the fact that I made this quilt.
The actual ginkgo leaf I used for the pattern was given to me by my neighbor. She had just been to the library on Lake Michigan and found the leaf.  I immediately cut one out of fabric but never used it.  So this leaf has been pinned up on my design wall for years.  It is good for it to have a real home. I quilted it with a wonderful variegated Superior gold thread.  The purple cup in the corner is from Ginkgoes Galore.
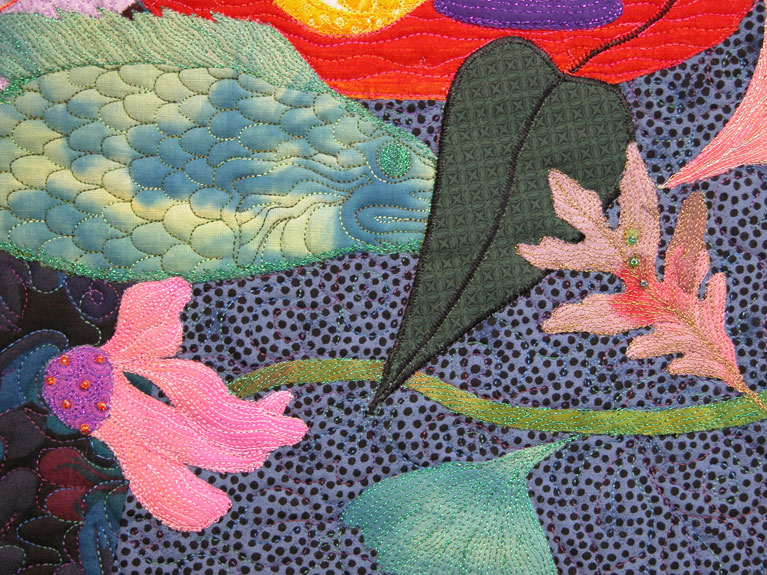
The fish is something I cut out years ago, I think they may have been part of the fish left over that could have been included in Fish Tales! Fish Tales is included in A Black and White Tale.  The coneflower lying on it's side is from the quilt Sewn Together. The little ginkgo leaf is something of which that I've used hundreds.
The pink coneflower is from a large quilt that I am currently embroidering. The cup is from Ginkgoes Galore. The large green hand painted and beaded leaf is from one of my all-time favorites Summer Sanctuary.  I painted hundreds of these coleus leaves and only had 2 or 3 remaining.

As usual, even though I've made a good attempt at using my little fusible scrap shapes, I still have many. It's difficult to close the drawer that holds them.  There will inevitably be more in the future.  It's a challenge to see how I can put them all together.

So here it is for you to enjoy, part of my quilting life in scraps!

Ann Fahl


Monday, December 19, 2011

Making Gifts

Here are the strip pieced sections with lots of embroidery.
I've been working for almost a week making ten small gifts.  The project took waaaaaay longer than I thought it should: I've used up lots of little strip pieced sections I've had for years;  played with all the program stitches on my machine; and experimented with some variegated threads, both rayon and metallic. The final result is unique, and the recipients will like them. For me this type of sewing is drudgery!

You will just have to use your imagination. This is all I can show you! Project #1 turned out mediocre, but it helped me tweek the size and order of stitching.  So, I will keep #1 for myself.  #2-10 turned out better, but not perfect. The limited piecing and seaming was done with the titanium topstich needles size 70, and it worked well.  All the parts are now sewn and assembled into a usable item.  After Christmas, I'll post the finished item so you can see what I've been talking about.

I'd love to show you, but I don't want to spoil the surprise for my friends that will be receiving one! Any how, I am thrilled that I am finished with this brilliant idea! In the process of embroidering I tried lots of different programmed stitches, and I found some beautiful new ones! It helped get me in the mood for the holidays, get the shopping done, and prepare the menu for Christmas dinner.  We won't be having tacos this year, it'll be lasagna instead. We're not much for tradition at my house.

My wish is that all of you get all your gifts completed too.  Be sure to sign them.

Almost Merry Holiday to you.

Ann Fahl


Tuesday, November 8, 2011

Oreo Continues to Entertain at the La Conner Quilt and Textile Museum

Summer Sanctuary, is a quilt when first completed didn't include Oreo.  She was added later!
Please just one more blog about my show at the La Conner, it runs through Dec 31, 2011!  This is the longest running exhibit I've ever had. Several people have let me know how much they enjoyed my show and the other 2 ongoing exhibits at La Conner, WA.  Some of you have even sent photos for me to see, it's been great. Believe me, it kills me to not be able to go and see it for myself!

A Quilter's Menagerie, is the first quilt that my husband has ever suggested a title for.
Because the size of this quilt is large, it makes a big impact: whether it hangs in my living room or is displayed at a show. This is a fun one to look at because there are so many details when you step up close to it. The green hand dyed fabrics were died by Dagmar Plenk of Milwaukee. She does are marvelous job of blending the procion dyes to make interesting fabrics.  They seem to glow behind the tree!

This is a smorgasbord quilt that contains at least one of everything that I do: metallic thread, hand bead, machine embroidery and quilting, machine applique, and all the animals and images that I've used throughout my career.

Indiana Memories was included in A Black and White Tale as part of Oreo's adventures
 Although Oreo isn't in this beautiful swan quilt, it has become part of her story in Jacquie's and my book about her adventures.  The quilt makes me feel wonderful, but when I look at the quilting I did, I'm amazed at how much I've improved since making this quilt.
Under the Giant Coneflowers is always a crowd favorite
Here Oreo is walking under the leftover coneflowers from Wow That's Orange. Wow, is also in the exhibit. I'll leave you with a springy quilt on this rainy November Day.  Do you remember Tiny Tim?
Tiptoe, lots of hand beading on this one
But now I realize that this one isn't in the show.  We can still enjoy it anyhow.  I will be talking more about metallic threads in the near future.

Ann Fahl

Sunday, November 6, 2011

This Time It's a Blue Metallic Thread!

I'm almost finished with the embroidery of the papyrus blossoms in this new quilt, but have a loooong way to go.  Next I'll embroider the brown portion of that plant that holds the flower.  I love the way the dark blue accents the blue/green hand dyed fabric. The contrast is greater than the green metallic I used on some of the other flowers.  See my earlier post.  This will make the quilt for interesting for the viewer!

The more you can embroider with metallics, the fewer problems you will have.  Quilting through the entire sandwich is more challenging.  I detail all this in my new Mastering Metallics booklet.

Ann Fahl

Thursday, November 3, 2011

Still Playing with Metallics!

For several months I've been working on a major piece.  When it's ready to exhibit I will show it to you, and write about how it developed.  But for now, I'm just beginning to embroider portions of it. The collage I've been working on, has been sort of a test piece for this new one which is currently titled, Egyptian Garden III.

After spending several days embroidering just stems, it was time to work on the papyrus flower/leaf.  I planned the embroidery (decorative stitching on just the quilt top) by doodling on a life size drawing on paper of the flower.  Right away I came up with something I really liked.  Since I've been playing with metallic threads now, I chose to use a green metallic on a mottled green flower. I used a topstitch 14/90 needle with the spool sitting upright.
Embroidered stylized papyrus ©2011 Ann Fahl
I am so thrilled with how this turned out, I just had to share it with you. The base of the flower hasn't been embroidered yet, but it will be stitched next. When the quilt is finished, the quilting will enhance the design direction that you see here.  From time to time, I'll show you little bits and pieces of this new quilt.

That's all for now.

Ann

Tuesday, November 1, 2011

The Beading Begins

Closed toe generic darning foot that Ann prefers for quilting around beads
Now that the embroidery is complete on the collage, I've started the beading. Unlike Lyric, I bead then quilt with a clear generic closed toe darning foot.  This system works well for me. In a much earlier post I discussed the pros and cons of darning feet.

The spot on the collage I chose first was the little wavy red line on the right hand side of the quilt. Check previous post for photos of this collage "Playing with Fabric." I ran a line of short stacks of seed beads.  I chose a size 6 yellow bead for the base and an iridescent red size 11 bead for the top.  This created an interesting line through the center.  Before viewing Lyric's dvd I would have just stitched a single line of seed beads down the middle and that would be it. So I've learned something new that is lots of fun. I love the combination of the two colors, it would be fun with 3 colors too!
Next I couldn't wait to put single bead stacks on the ends of the spiral eyelashes on the lower left corner. I chose the same size 6 red bead for the base and a size 11 black bead for the top.  This adds a nice little touch to the ends.  Although it doesn't show in this photo, the spiral is appliqued with a rusty red metallic thread and the eyelashes are covered with a red metallic size 40 thread.

Next, I decided to change colors and bead the inside of the large lime green leaf at the center top.  I tightly clustered some iridescent seed beads in the center. The leaf was hand painted and left over from my quilt titled Summer Sanctuary. The edges of the pink center already had a little free-motion stitching in a variegated pink thread.

Who knows what is next?

Ann Fahl


Saturday, October 29, 2011

Quilting with Metallic Threads Goes International!

It has been a few days since I announced my new booklet on metallic threads. This has been amazing. I now have sent booklets to three different countries, Finland, Germany and South Africa.  It seems that quilters everywhere have problems with metallic threads. This has really energized me and challenged me to do more quilting with metallics.

Diane Gaudynski has been playing with metallics too, check out her blog. She has written an extensive blog about choice of fabrics and how it plays such a huge part in the success with quilting with any decorative thread!

My quilting isn't anything like Diane's but I have just finished a sample quilting with gold sliver thread on some hand dyed fabric.  Hand dyes have caused great challenges in the past. You won't like the fabric I chose, but its the only fabric I am willing to use up for samples.  I chose the color gold so you can more easily see the stitching. I've had to pull it out from under the cat, Oreo to take a picture so you can see it.  So here it is, in all its beauty:
Quilting with wool batting, hand dyed fabric top and backing

The thread didn't break once!  Here is what I did:
  • The "Sliver"spool was sitting vertically on the machine
  • The Bottom Line in the bobbin
  • 14/90 topstitch needle
  • top tension set on 2.5
  • Take some time testing the tension setting on a sample swatch before you begin on a project
Now I'm thinking about places I can use a little bit of this wonderful shiny flat thread in quilts that are already finished!  Who knows.

Please let me know how you have found success with metallics. Or any tips you may have to share. Good luck to all of you that want to play with metallics.

Ann Fahl

Saturday, October 22, 2011

Playing with Fabrics

Last week, I had some free time. I've had the feeling that I haven't played in my studio in a long time.  I've been doing lots of writing, but not really any quilting.  Hmmmm, what am I avoiding?  Lyric's Bead DVD  arrived and I found it quite inspiring, so I decided to make a collage to both bead and embroider.
Collage, pinned and un-fused, it needs squaring up too
 There are two little drawers full of fused scraps in my studio. To begin I created a pieced background with 5 irregular strips of dark fabrics.  From my stash I pulled out a gray, dark print, blue, red and green fabrics of a similar dark value, pieced them together.  This is not an attractive background but it is interesting.

Next I pulled out all those little fused scraps of this and that.  All saved from earlier projects because they were too valuable to throw out! So here is what I have so far.  It's fun, but perhaps a monstrosity!  We'll see.  Mostly it is a learning and confidence building exercise.
Completed collage, fused and embroidery has been started
There are images in this thing, from quilts that have not yet been finished, and pieces that are as old as the hills!
Appliqued spiral from lower left corner, appliqued with red metallic thread and a programmed stitch
I have no idea where this spiral was from, but I have a bunch of them in warm colors. I am doing as much as the embroidery as I can with metallic threads.  If you look at the right hand column of this blog, you will see my newest booklet pictured:  Mastering Metallics.  So I'm using all the tips and ideas I've discovered in the last year or more, working on that project. My next blog will be all about that booklet.

Rhonda's Ginkgo, embroidered with variegated gold thread, but not trimmed up
There is a large hand painted ginkgo fused in the center right area of the collage.  Maybe 5 years ago my neighbor Rhonda, gave me a ginkgo leaf this size that she found when she was at the library.  I cut this hand painted fabric leaf out immediately, but it never found a home, so here it is.  This is why these collages are so much fun.

Off and on, as I make progress on the metallic thread and the beading, I'll show you what I've done. You can see the endless possibilities for bead-work and threads.  We'll see what evolves.  It'll be fun.

Have any of you been to see my show at the La Conner quilt museum?  If you have, please let me know what you think.  I haven't had any feedback yet, and I'm dying to know what it looks like!

Ann Fahl

Tuesday, October 4, 2011

Piecing with a Titanium Topstitch Needle

All this business began with a booklet I am writing called: Mastering Metallics.  I have had trouble quilting with metallic threads for years.  I like to think of myself as a thread expert, I wrote two books on the subject.  But I'm coming clean, right here and now; quilting with metallics has been my downfall!

Thankfully the problems have been solved, after hours and hours of trial, error, tears, and emailing other experts on quilting and thread.  The booklet is almost ready to be published, it has a great cover!  Anyhow, I'm kind of off topic.

The other day the e-newsletter came from thequiltshow.com and it featured a video with Bob from Superior Threads, talking about "using the correct needle."  So I watched it, thinking I might find some new information of interest for my booklet. Well, I did.
Size 70/10 Titanium Coated Topstitch Needles
Just in passing Bob mentioned that the size 70/10 titanium topstitch needle could be used in piecing. I'm the lazy type, and if I have to do just a little piecing, I'll use what is in the machine. That's usually a 80/12 topstitch needle. But I don't like the larger holes that it creates when I'm sewing a seam.  But like I said, I'm lazy.

I sell these needles when I'm on the road, and I have a pack of the 70/10 size sitting near my machine. Oh yes, they piece beautifully. They have a longer eye, which gives the thread plenty of space to move around while the stitch is being created. Because the eye isn't too big, it doesn't make that big hole on either end of the stitch. Wow, what an eye opener. I now promise, with right hand raised, to "always change the needle to a topstitch 70/10 when I sew a seam or piece." 

In this picture, Ann is piecing with a new 70/10 titanium topstitch needle.  This picture just proves that you should always look in the mirror and comb your hair before taking a picture of yourself sewing!
 OK, now raise your right hand, say it with me:  "I promise to always change the needle to a topstitch 70/10 when I sew a seam or piece."  You will learn that the titanium needles last much longer, so you will actually save money on needles when you do this! This will make your world a better place.

It goes to show you that one never knows when some little piece of news will change the way you do things.

Have a great day.

Ann